In this article I’m going to show you, step by step, how to set up an OSX machine to provide secure access to git repositories over the internet via ssh. This was tested on OSX 10.6.
github provides git repository hosting with a lovely interface. If github isn’t feasible, then this article will help you set up something similar, unfortunately without the nice interface.
I assume that you already have git installed. If not, install the latest version from the git website.
We will be walking through the following steps:
- Give the server a static IP address on the local network
- Set up port forwarding on the router
- Getting dynamic DNS
- Add a user named “git” to the server
- Setting up ssh securely on the client computers
- Setting up ssh securely on the server
- Making a bare git repository
- Using your new git server
Step 1. Give the server a static IP address on the local network
The server needs a static IP address on the local network for the next step (port forwarding) to work. This can be set in the following location:
System Preferences » Network » Advanced » TCP/IP
If the Configure IPv4 option is set to Manual or Using DHCP with manual address, then you already have a static IP address.
If the Configure IPv4 option is set to Using DHCP, then change it to Using DHCP with manual address. Set the IPv4 Address option to an address that won’t conflict with the DHCP addresses from the router. I’m going to use 192.168.1.150 as an example of the server’s static IP address.
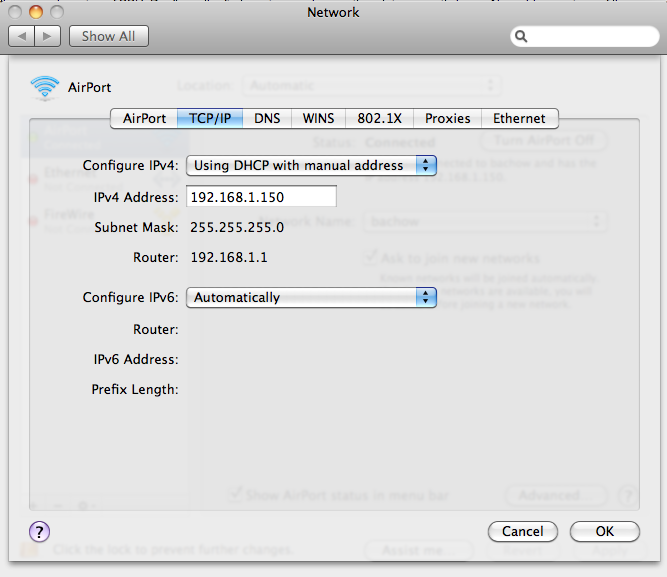
Remember the IPv4 Address setting and the Router setting, as these will be needed in the next step.
Step 2. Setting Up Port Forwarding On The Router
With the default settings, your home router most likely acts as a firewall to the internet outside. The router usually ignores inbound connection requests from the internet. To allow people to access the git repo via the internet, we need to add a port forwarding rule.
Open up your web browser and type the IP address of your router into the address bar. Once inside the router configuration page, you’ll have to hunt around for the port fowarding options because each router is different.
ssh usually works on port 22, but for extra security, we’re going to expose a different port to the internet. Think of a port number between 1024 and 65535 that you will remember; I’m going to use port 12345 as an example.
Configure the router so that the external port 12345 is forwarded to the internal port 22 of the servers static IP address (set in Step 1), like so:

Save the settings on the router.
Step 3. Getting dynamic DNS
Unless you’ve paid your ISP for a static IP address, your router’s IP address on the internet will change from time to time. To avoid having to work out the IP address every few days, you can set up dynamic DNS to automatically give the correct IP address.
I’ll leave out the details for brevity, but you can get this service for free at places like DynDNS.com. You basically sign up for a free domain name like example.dyndns.org, then you install a program on the server that constantly updates the domain with the current IP address.
Instead of doing this…
git clone ssh://git@124.186.120.123:12345/myrepo.git
you can do this…
git clone ssh://git@example.dyndns.org:12345/myrepo.git
Step 4. Add a user named “git” to the server
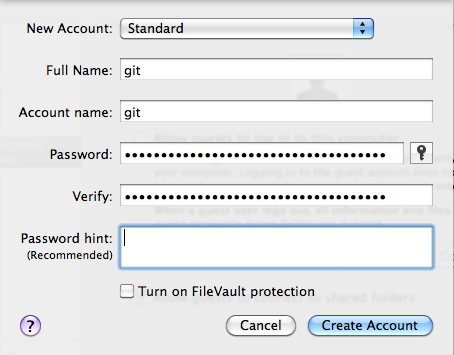
I’m going to add a single user to the server. All clients will connect via this single user when pushing and pulling from the repo. You could set up a user for each client if you wanted, but it’s by no means necessary.
Open up System Preferences » Accounts and add a standard user like so:
Log into the new git user account. Open Terminal.app and type the following:
echo 'export PATH="$PATH:/usr/local/git/bin/"' >> ~/.bashrc
Log out of the git user, and log back into your administrator account.
Step 5. Setting up ssh securely on the client computers
Even with a non-standard ssh port, your computer is open to automated password guessing attacks from the internet. If your user name is something common like “bob”, and your password is something easy to guess like “abc123”, then you may be in danger.
To harden up the security, we are going to disable authentication with passwords. Instead, authentication will be done with ssh public keys. You can think of ssh public keys as very long, randomly generated passwords that you don’t have to type in.
This step must be completed on every client computer that wishes to connect to the server. Do not do this step on the server.
Open up Terminal.app and type the following:
cd
mkdir -p .ssh
cd .ssh
ssh-keygen -f my_git_key -t rsa -q
ssh-add -K my_git_key
cp my_git_key.pub ~/Desktop
You should see something like this:

When it asks you to type in a passphrase I advise you to do so, even though it’s optional. If someone steals your computer, the passphrase on the key prevents them from connecting to the server. It is just an added layer of security.
You should now have a file called my_git_key.pub on your desktop. This is one half of your key, stored as a text file. Keep this file, because it is needed in the next step.
Feel free to open my_git_key.pub in any text editor to have a look at it. Like I said, it looks like a very long random password.
Step 6. Setting up ssh securely on the server
Now we’re going to set up the server to accept secure connections.
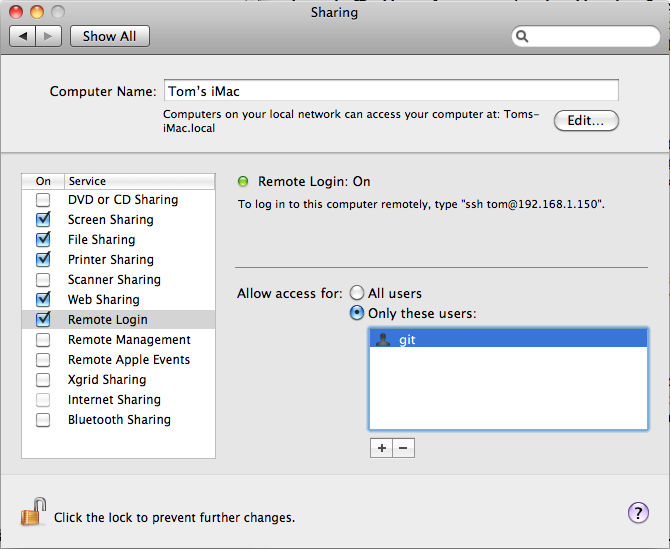
First, open up System Preferences » Sharing and turn on Remote Login (this is ssh). Set Allow access for to Only these users, and add the git user to the list. It should look like this:
Now open Terminal.app and type in sudo open /etc/sshd_config. When it asks
you for a password, type in your login password for the account you are
curently in. This step requires your account to be an administrator account.
In the newly opened text editor, change the following lines as indicated below.
| Find this line | Change it to this |
|---|---|
#PermitRootLogin yes |
PermitRootLogin no |
#PasswordAuthentication no |
PasswordAuthentication no |
#ChallengeResponseAuthentication yes |
ChallengeResponseAuthentication no |
#UsePAM yes |
UsePAM no |
Save the file and quit it.
Now, log out of your current account and log into the git user that we created in Step 4. Open up Terminal.app again, and type in the following:
cd
mkdir -p .ssh
touch .ssh/authorized_keys
open -a "TextEdit" .ssh/authorized_keys
This should open a file called authorized_keys, and that file should be completely empty at this point.
Now, remember the my_git_key.pub files from Step 5? There should be one of these files on the desktop of every client computer. You will need these files now on the server computer.
Each my_git_key.pub file contains a single line of text. If your editor is set to wrap text then it may look like more than one line, but it isn’t. This is important, because putting a new line anywhere will break the file.
Get each my_git_key.pub file, copy the single line from it, and paste it into the blank text file (authorized_keys) on a new line. Each line in authorized_keys should hold the entire contents of each my_git_key.pub file. If there are four clients, then there should be four lines. You get the idea.
TextEdit.app doesn’t have the option to turn off text wrapping, so I advise you use a better text editor such as TextWrangler, which is free. To open the file in TextWrangler instead of TextEdit, just replace “TextEdit” with “TextWrangler” in the Terminal.app commands above.
Save the authorized_keys file, and restart the server computer.
Step 7. Making a bare git repository
Now that everything should be set up, all that remains is to make the git repository.
You can’t push a branch to a server if that branch is currently checked out on the server. That would cause problems for whoever is working on the server. Seeing as nobody is actually working on the server this isn’t a problem, because nothing needs to be checkout out. This is the definition of a “bare” git repo: a repository that can never have files checked out. Everyone pulls and pushes from the server like normal, but nobody can actually work on the server (unless they make a non-bare clone).
If you are creating a new repository called “my_bare_repo.git”, you can make it bare like so:
git init --bare my_bare_repo.git
If you have an existing repo, you can make a bare clone of it like so:
git clone --bare /wherever/the/existing/repo/is.git
Step 8. Using your new git server
Let’s say you have the following setup:
| Dynamic domain | mygit.dyndns.org |
| Forwarded port | 12345 |
| Bare git repo path | /Users/git/my_repo.git |
On the client machine, you would clone the repo like so:
git clone ssh://git@mygit.dyndns.org:12345/Users/git/my_repo.git
If you have an existing local repo, you can add a remote named “home” like so:
git remote add home ssh://git@mygit.dyndns.org:12345/Users/git/my_repo.git
This may ask you for a password when it tries to authenticate with your ssh key. This is the password you typed in in Step 5. It may be different for each client computer.
Once you’ve got your cloned repo, you work on it like normal. You pull down
updates from the server with git fetch or git pull, and you push branches
with git push origin branch_name_here.